Submitted by guitar-list on
| Attachment | Size |
|---|---|
| 314.18 KB |
Project:
Step number:
Instructions:
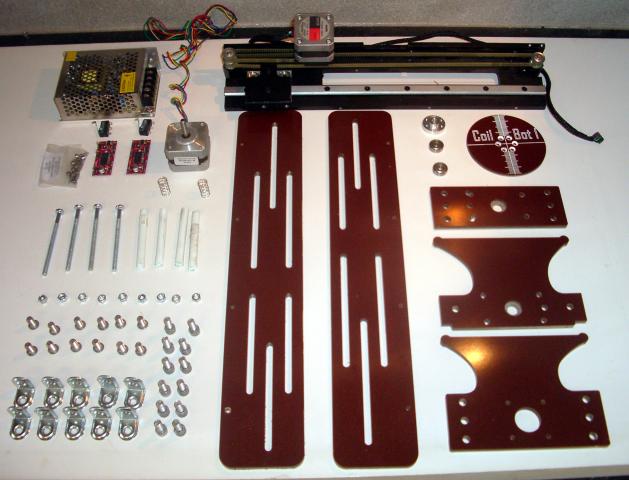
My CNC winder uses a spindle winding mechanism - the pickup directly mounted onto a small stepper motor. The chassis design is comes from the opensource Egg-Bot project. The Egg-Bot is a 2D plotter designed to draw on round or egg-shaped objects and is a fun introduction to motion control projects (I have one!).
I changed the Egg-Bot design slightly by adding a linear traverse unit - to allow uniform motion along the coil when winding. I bought this linear traverse (complete with stepper motor) cheap on E-bay, and it is bolted to one side of the Egg-Bot chassis. The stepper motor drives a precision linear bearing via pulleys and a toothed belt (1:1 ratio).
I cut the chassis out from 6mm Tufnol using my home-made CNC router (described here). You can download the DXF files for the chassis below. I increased the overall size slightly and had to enlarge and move the bracket holes because I couldn't get the original Egg-Bot size brackets in the UK. I also used some 5mm bearings instead of the Egg-Bot bushings on the tailstock, because I couldn't find the bushings. Finally I moved the winding motor to a central position (its off to one side on the original Egg-Bot).
The whole thing bolts together using brackets from Clas Ohlson and M6 bolts. The faceplate is made from 4mm Tufnol and bolts onto the motor using a 5mm Polou hub.
The tensioner was another e-bay find - an M.E.F. forum member (peskywinnets) alerted me to some Tanac MT100 tensioners going cheap. These have just the right specifications for guitar pickup wire (I have attached the MT100 manual below for reference).
